Exposing my Homelab with Cloudflare Tunnels
How I use Cloudflare Tunnels to expose some of my homelab services to the internet without opening ports or needing a static IP.

TL;DR
I use Cloudflare Tunnels to expose some of my homelab services to the internet without a public IP, without opening ports, and with authentication in front of anything sensitive. The tunnel runs as a Docker container or a Kubernetes pod, services join a shared network, and the Cloudflare side is fully managed with OpenTofu. Adding a new service takes a few lines of YAML and a tofu apply.
The Problem
I run a bunch of self-hosted services in my homelab. For a while I was using port forwarding with Cloudflare proxied DNS pointing to my IP, and a DDNS updater to keep up with IP changes.
It worked, but my ISP gives me a dynamic IP that changes whenever it wants, and I still had ports open on my router, which always made me a bit uncomfortable. I actually requested my ISP to take me out of CG-NAT, and they did, but twice they put me back behind it without any notice, breaking access to all my services.
That was the last straw. Then I discovered Cloudflare Tunnels: no open ports, no need for a public IP, and an auth layer on top for free.
Available options
If you want to expose a service from your homelab to the internet, these are the main options:
| Port Forwarding | Cloudflare Tunnels | Tailscale Funnel | NetBird Reverse Proxy | |
|---|---|---|---|---|
| Requires public IP | Yes | No | No | No |
| Open ports | Yes | None | None | None |
| Works behind CG-NAT | No | Yes | Yes | Yes |
| Built-in auth | No | Yes (Zero Trust) | No | Yes (SSO, PIN, password) |
| DDoS protection | No | Yes | No | No |
| Custom domain | Manual DNS | Yes | *.ts.net only | Yes |
| Non-HTTP services | Yes | Via browser or WARP | Limited | Yes (TCP, UDP, TLS) |
| Added latency | None | Some (via Cloudflare) | Some (via DERP) | Some (via proxy) |
| Cost | Free | Free tier | Free (beta) | Free tier (5 users) |
| Maturity | N/A | Production ready | Beta | Recent (v0.65+) |
Port forwarding is the classic approach — but it requires a public IP, opens your network directly to the internet, and gives you zero built-in protection.
Cloudflare Tunnels gives you public access with authentication, DDoS protection, and custom domains — all without opening a single port. The trade-off is that all traffic goes through Cloudflare’s network.
Tailscale Funnel also exposes services without port forwarding, but it’s still in beta, limited to *.ts.net domains, and doesn’t include an auth layer. Worth keeping an eye on if you’re already using Tailscale.
NetBird Reverse Proxy is the newest option — it supports custom domains, non-HTTP protocols (TCP, UDP, TLS), and has built-in auth with SSO, PIN, or password protection. It’s available on both NetBird Cloud and self-hosted. The trade-off is that it’s a recent feature (v0.65+) and less battle-tested than Cloudflare Tunnels.
For private access (SSH, admin panels), I use Tailscale as a VPN. For public-facing services, Cloudflare Tunnels.
Prerequisites
Before starting, you’ll need:
- A domain managed by Cloudflare (free plan works). If you don’t have one, you can grab a cheap
.comor.devfor ~$10/year - A Cloudflare account with Zero Trust enabled (free for up to 50 users)
- A way to run
cloudflared— Docker, Kubernetes, or as a standalone binary - A Cloudflare Tunnels token — you can create one from the Zero Trust dashboard under Networks > Tunnels
What is Cloudflare Tunnels
Cloudflare Tunnels is part of Cloudflare Zero Trust. It creates an outbound-only connection from your network to Cloudflare’s edge. The key part is that you don’t open any port. A small client called cloudflared runs inside your network, connects out to Cloudflare, and then Cloudflare routes incoming traffic back through that connection to your services.
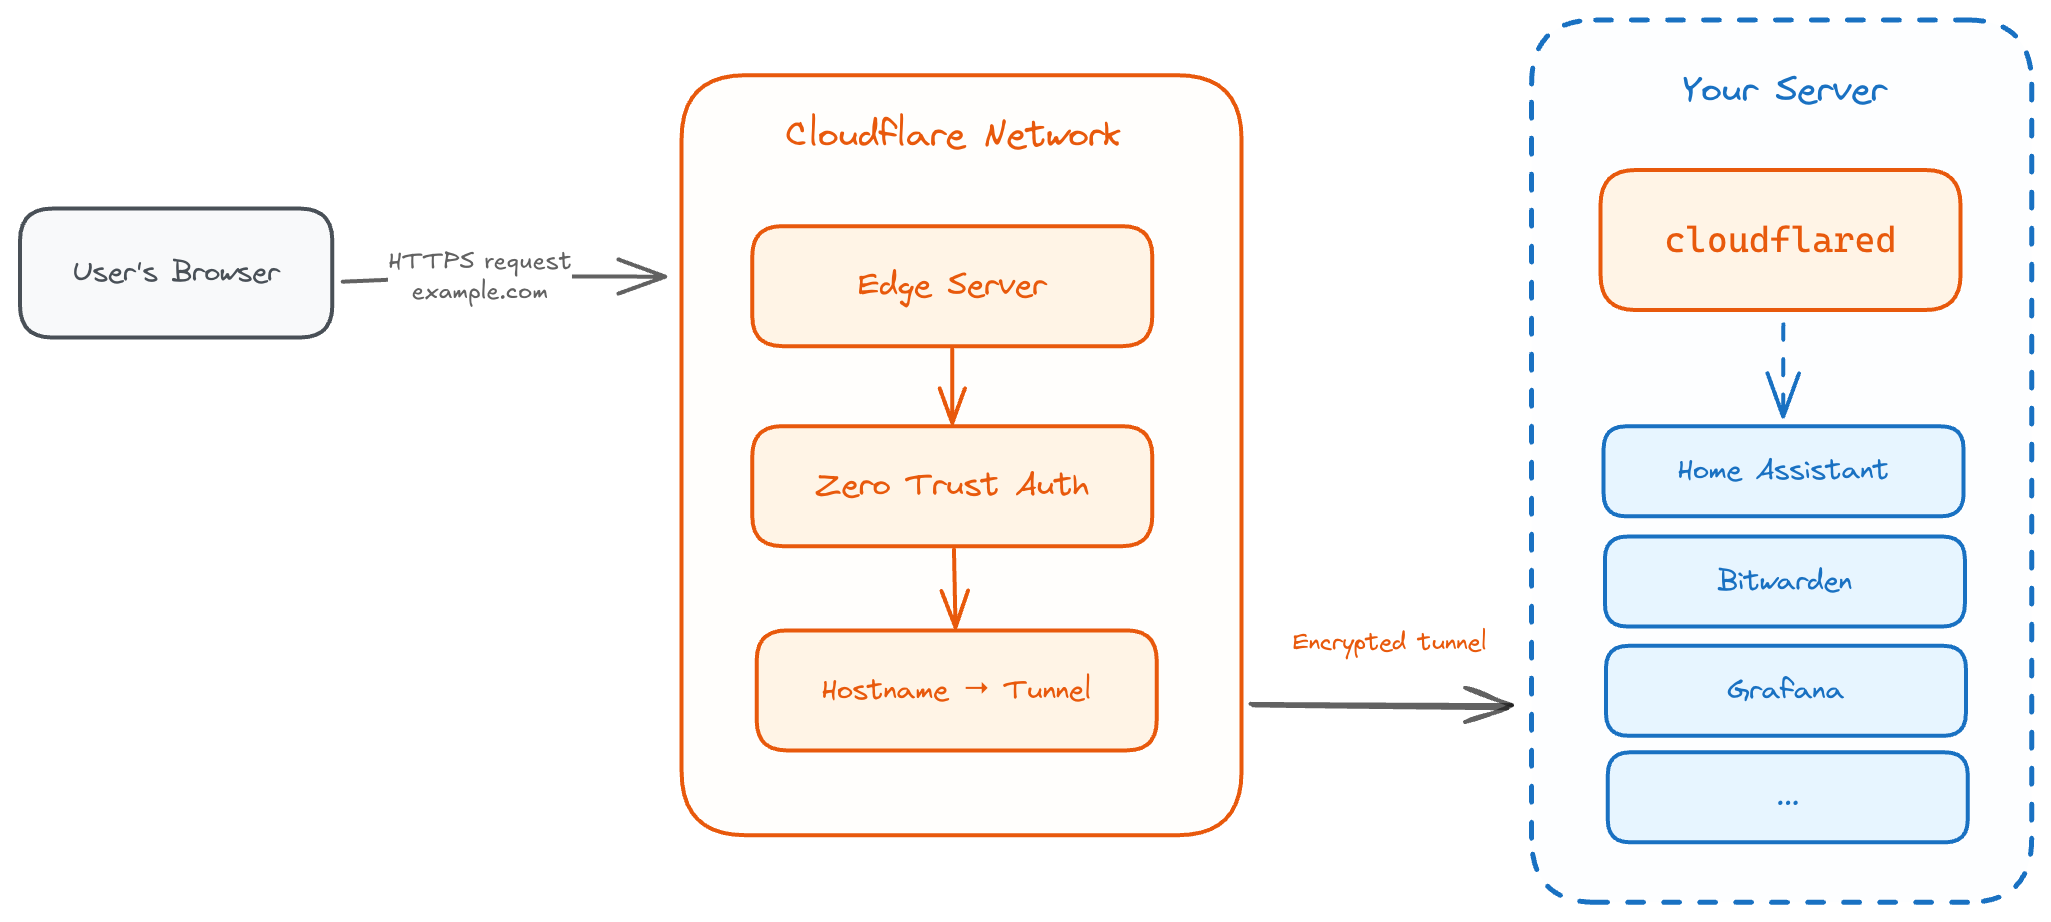
Since the connection is outbound, your router doesn’t need any port forwarding. And because Cloudflare handles DNS, you don’t care about your IP changing anymore. Your services are always reachable at a fixed domain.
Setting It Up with Docker
The setup is surprisingly simple. I run cloudflared as a Docker container:
services:
  cloudflared:
    image: cloudflare/cloudflared:latest
    container_name: cloudflared
    restart: unless-stopped
    command: tunnel --no-autoupdate run
    environment:
      - TUNNEL_TOKEN=${CLOUDFLARE_TUNNEL_TOKEN}
    networks:
      - tunnel-net

networks:
  tunnel-net:
    name: tunnel-net
    driver: bridge
The trick is the tunnel-net network. This is a shared Docker network — any service that joins it becomes reachable through the tunnel.
For example, to expose Home Assistant I just add tunnel-net as an external network in its compose file:
services:
  homeassistant:
    image: homeassistant/home-assistant:stable
    # ... your usual config
    networks:
      - tunnel-net

networks:
  tunnel-net:
    external: true
Then in the Cloudflare Zero Trust dashboard, I add a public hostname like ha.mydomain.com pointing to http://homeassistant:8123. Done. No port forwarding, no DDNS, no nginx config.
Same pattern works for everything else — Bitwarden, Grafana, or any other self-hosted service. As long as cloudflared can reach the service, you just add the hostname and it’s reachable from the internet.
Managing It with OpenTofu/Terraform
Clicking around the Cloudflare dashboard works for the first setup, but I try to keep everything as IaC. So I terraformed the whole thing using OpenTofu and the Cloudflare provider.
I have a simple YAML config that defines the tunnel and what services to expose:
tunnel_name: homelab-tunnel

ingress:
  - hostname: status.marvincloud.io
    service: http://statusly.statusly.svc:8080
    zone: marvincloud.io

  - hostname: grafana.marvincloud.io
    service: http://grafana:3000
    zone: marvincloud.io
    access_emails:
      - marvin@marvincloud.io

  - hostname: ha.marvincloud.io
    service: http://homeassistant:8123
    zone: marvincloud.io
    access_emails:
      - marvin@marvincloud.io

  - hostname: bitwarden.marvincloud.io
    service: http://bitwarden:80
    zone: marvincloud.io
    access_emails:
      - marvin@marvincloud.io
And the Terraform code reads this config and creates everything — the tunnel, DNS records, and access policies:
locals {
config = yamldecode(file("config.yml"))
}
module "cloudflare_tunnel" {
source = "github.com/msxdan/terraform-cloudflare-tunnel?ref=v0.1.0"
account_id = var.cloudflare_account_id
tunnel_name = local.config["tunnel_name"]
ingress_rules = local.config["ingress"]
github_oauth = {
client_id = var.github_oauth_client_id
client_secret = var.github_oauth_client_secret
}
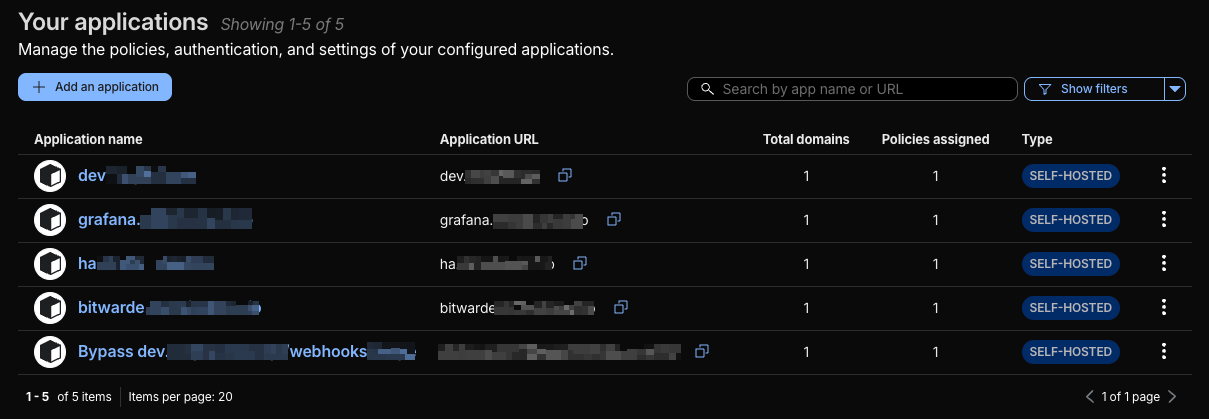
}Adding a new service is just a few lines in the YAML and tofu apply. The module handles the tunnel creation, DNS CNAME records, Zero Trust access policies, and bypass rules for public paths like webhook endpoints automatically.
I haven’t found an existing Terraform module that covers all of this (tunnel + DNS + access policies + bypass rules), so I built my own. I open-sourced the module if you want to check it out: terraform-cloudflare-tunnel.
Access Policies with Zero Trust
One thing I really like about this setup is that you don’t just expose services raw to the internet. Cloudflare puts an authentication layer in front.
I use GitHub OAuth as identity provider. When someone tries to access any of my services from outside, they hit a Cloudflare login page first. Only the email addresses I whitelist can get through.
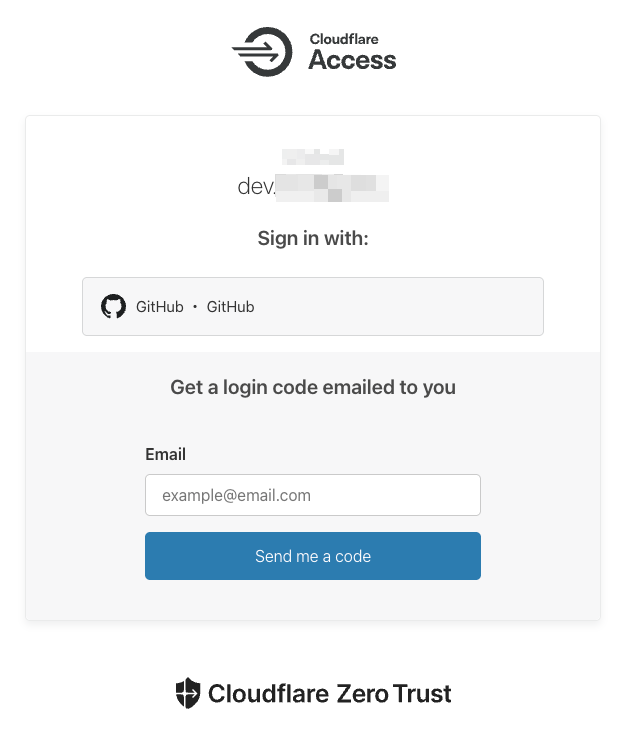
You can also set bypass rules for specific paths — useful if your app has webhooks that need to be publicly reachable without auth.
This is way better than just having your services open with maybe basic auth or nothing.
Monitoring with Prometheus and Grafana
cloudflared exposes Prometheus metrics out of the box. You just need to enable the metrics server:
services:
  cloudflared:
    image: cloudflare/cloudflared:latest
    container_name: cloudflared
    restart: unless-stopped
    command: tunnel --no-autoupdate --metrics 0.0.0.0:2000 run
    environment:
      - TUNNEL_TOKEN=${CLOUDFLARE_TUNNEL_TOKEN}
    networks:
      - tunnel-net
The --metrics 0.0.0.0:2000 flag starts a metrics endpoint on port 2000. Then add it as a Prometheus scrape target:
scrape_configs:
  - job_name: cloudflared
    static_configs:
      - targets: ['cloudflared:2000']
Some useful metrics to watch:
cloudflared_tunnel_active_streams— number of active connections through the tunnelcloudflared_tunnel_request_per_second— request ratecloudflared_tunnel_response_by_code— HTTP response codes (useful for spotting errors)cloudflared_tunnel_server_locations— which Cloudflare edge locations your tunnel connects to
You can also check tunnel health from the CLI:
docker exec cloudflared cloudflared tunnel infoAnd of course, the Cloudflare Zero Trust dashboard itself shows connector status, traffic analytics, and access logs — useful for a quick check without opening Grafana.
Redundancy
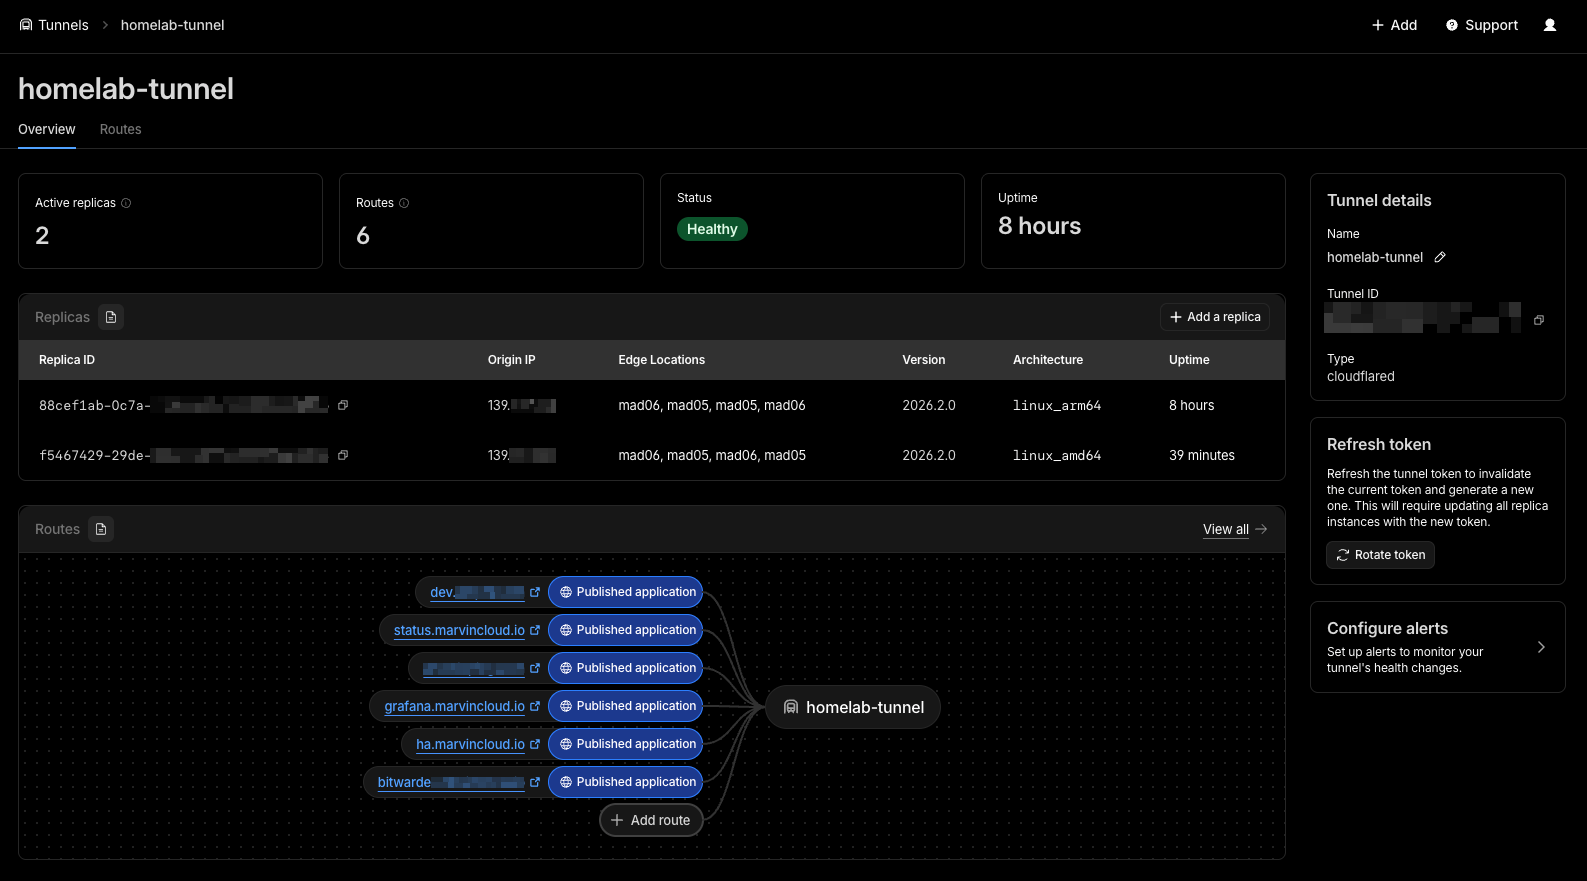
One nice thing about Cloudflare Tunnels is that you can run multiple cloudflared instances with the same token. Cloudflare will load balance between them automatically.
In my case, I run one instance on my main Proxmox node and another one on a different machine. If one goes down, the other keeps serving traffic. Same token, same config.
You just need to make sure the services are reachable from each cloudflared instance. If you’re pointing to IPs or DNS names that resolve across your LAN, it works from any of them.
In the Cloudflare dashboard, you’ll see multiple connectors for the same tunnel, each showing as “Healthy”. If one drops, the others keep the tunnel alive.
This is a simple way to get high availability without any extra tooling — just run another container.
Troubleshooting
Some common issues I’ve run into:
Tunnel shows as “Healthy” but service returns 502. The tunnel itself is fine, but cloudflared can’t reach the backend service. Check that the service is on the tunnel-net network and that you’re using the right container name and port. docker exec cloudflared wget -qO- http://servicename:port is a quick way to test connectivity from inside the tunnel container.
Access login loops. If you keep getting redirected to the login page after authenticating, check that your application’s session cookies aren’t conflicting with Cloudflare Access cookies. Adding your domain to the allowed_idps in the access application config usually fixes this.
WebSocket disconnects. Home Assistant and other WebSocket-heavy services work but may drop connections on long-lived sessions. This is a known quirk. The clients reconnect automatically, so it’s not really a problem in practice.
DNS propagation delays. After adding a new hostname, give it a couple of minutes. Cloudflare is fast but not instant. You can check with dig hostname.example.com to see if the CNAME is pointing to <tunnel-id>.cfargotunnel.com.
Token rotation. If you regenerate the tunnel token, you need to update the TUNNEL_TOKEN env var on all cloudflared instances. Miss one and that connector will silently disconnect.
Pricing
Cloudflare Tunnels is part of the free Zero Trust plan. Here’s what you get:
- Free plan: Up to 50 users, unlimited tunnels, unlimited bandwidth. This covers everything a homelab needs
- Pay-as-you-go ($7/user/month): Custom login pages, more detailed logs, extended session durations
- Contract plan: SSO integrations, dedicated support
The only thing you pay for is the domain itself (~$10/year). I’ve been on the free plan for over a year with multiple tunnels and services — no issues, no throttling.
For non-HTTP protocols, SSH and RDP can actually be accessed through the browser without installing anything on the client. For arbitrary TCP (like game servers), you’ll need cloudflared or WARP on the client side, both free for personal use.
Limitations and Trade-offs
It’s not perfect though. Some things to consider:
Latency. Traffic goes through Cloudflare’s network, so there’s added latency. For web dashboards and most apps I don’t really notice it, but it’s something to be aware of.
Cloudflare is the middleman. All your traffic passes through them. They can see it. For my use case I’m fine with that, but it’s something to be aware of — especially if you’re running sensitive services like a password manager.
Non-HTTP requires extra setup. SSH and RDP work through the browser or WARP, but for arbitrary TCP/UDP you’ll need cloudflared or WARP on the client side.
WebSocket reconnects. Services that use WebSockets (like Home Assistant) work through the tunnel, but I’ve seen occasional disconnects on long-lived connections. They reconnect automatically, so it’s not a real problem, but worth mentioning.
No large non-HTML content. Cloudflare’s TOS on the free plan doesn’t allow serving large amounts of non-HTML content through their proxy. So if you’re thinking about exposing Plex, Jellyfin, or Nextcloud for streaming or big file downloads — be careful. They can terminate your tunnel if they consider it abuse.
100MB upload limit. On the free plan, each HTTP request is limited to 100MB. This can be a problem if your apps handle large file uploads. Something to keep in mind if you’re running a file sharing service or similar.
Wrapping Up
Cloudflare Tunnels solved exactly what I needed. I can access my homelab services from anywhere, without a public IP, without opening ports, and with proper auth in front of anything sensitive.
The setup is straightforward — adding a new service takes minutes, whether you do it from the dashboard or with IaC.
If you’re in the same situation — dynamic IP, don’t want to open ports, just want to reach your homelab from outside — give Cloudflare Tunnels a try. The free tier covers everything you need for personal use.